Tuesday 1 December 2015

Bibliography

@affey_duck., 2015. Image of a makeup artist's fork wound re-uploaded onto @affey_duck's instagram [digital image] [viewed 06/10/2015]. Available from: http://ink361.com/app/users/ig-1235106132/affey_duck/photos/ig-919034375047329026_1235106132 https://scontent.cdninstagram.com/hphotos-xpa1/t51.2885-15/e15/10948996_1568809283374821_847200351_n.jpg

Adams, M. (no date) What kind of snake has green coloring?. Available at: http://animals.mom.me/kind-snake-green-coloring-2723.html (Accessed: 15 November 2015).

Alford, J. (2014) Deadly Boomslang snake venom makes you bleed from all of your orifices until you die. Available at: http://www.iflscience.com/plants-and-animals/deadly-boomslang-snake-venom-makes-you-bleed-all-your-orifices-until-you-die (Accessed: 15 November 2015).

Anderhuber, F., 2012. Cross section image of a cheek [digital pdf image] [viewed 06/10/2015]. Available from: http://www.researchgate.net/publication/221690462_Anatomy_of_the_Cheek_Implications_for_Soft_Tissue_Augmentation

AYCYAS.COM., (Dateunknown). Dr. Jekyll and Mr Hyde (1931) [viewed November 2015]. Available from: http://www.aycyas.com/jekyllandhyde1931.htm

Bray, S., 2014. Sculpting Prosthetics: Skin Textures [viewed 13/10/2015]. Available from: https://www.youtube.com/watch?v=1IAc2hDCHlQ

Chaos Control Digizine., 2000. Ben Chapman [viewed November 2015]. Available from: http://www.chaoscontrol.com/ben-chapman-interview-with-the-gillman/

Corson, R., Glavan, J. and Norcross, B. (2015) Stage Makeup. Tenth edn. CRC Press.

DAVID, L., 2009. Avatar Concept Designer Reveals the Secrets of the Na'Vi [viewed November 2015]. Available from: http://io9.com/5354315/avatar-concept-designer-reveals-the-secrets-of-the-navi

Debreceni, T., 2009. Special Makeup Effects for Stage and Screen. Focal Press, Burlington.

Ebony., 2014. Re-upload of wolf scratch image on Pinterest [digital image] [viewed 06/10/2015]. Available from: https://www.pinterest.com/pin/456411743459222246/ https://s-media-cache-ak0.pinimg.com/736x/54/bd/f7/54bdf7f3256c7395628c54ce530b9707.jpg 

ForensicMed., Date Unknown. Table of differences between lacerations and wounds [digital image] [viewed on 06/10/2015]. Available from: http://www.forensicmed.co.uk/wounds/blunt-force-trauma/lacerations/ 

Hannigan, H., (Date unknown). The Evolution of Horror Movie Makeup and Special Effects [viewed November 2015]. Available from: https://www.timetoast.com/timelines/the-evolution-of-horror-movie-makeup-and-special-effects

HowMed., Date Unknown. Incised and Stab Wounds [digital image] [viewed on 06/10/2015]. Available from: http://howmed.net/forensic/incised-and-stab-wounds/

MedicalTerms., (Year of Publication Unknown). Lips Cheeks and Palate. Generic Look.com Medical Encyclopedia [viewed 06/10/2015]. Available from: http://medicalterms.info/anatomy/Lips-Cheeks-And-Palate/

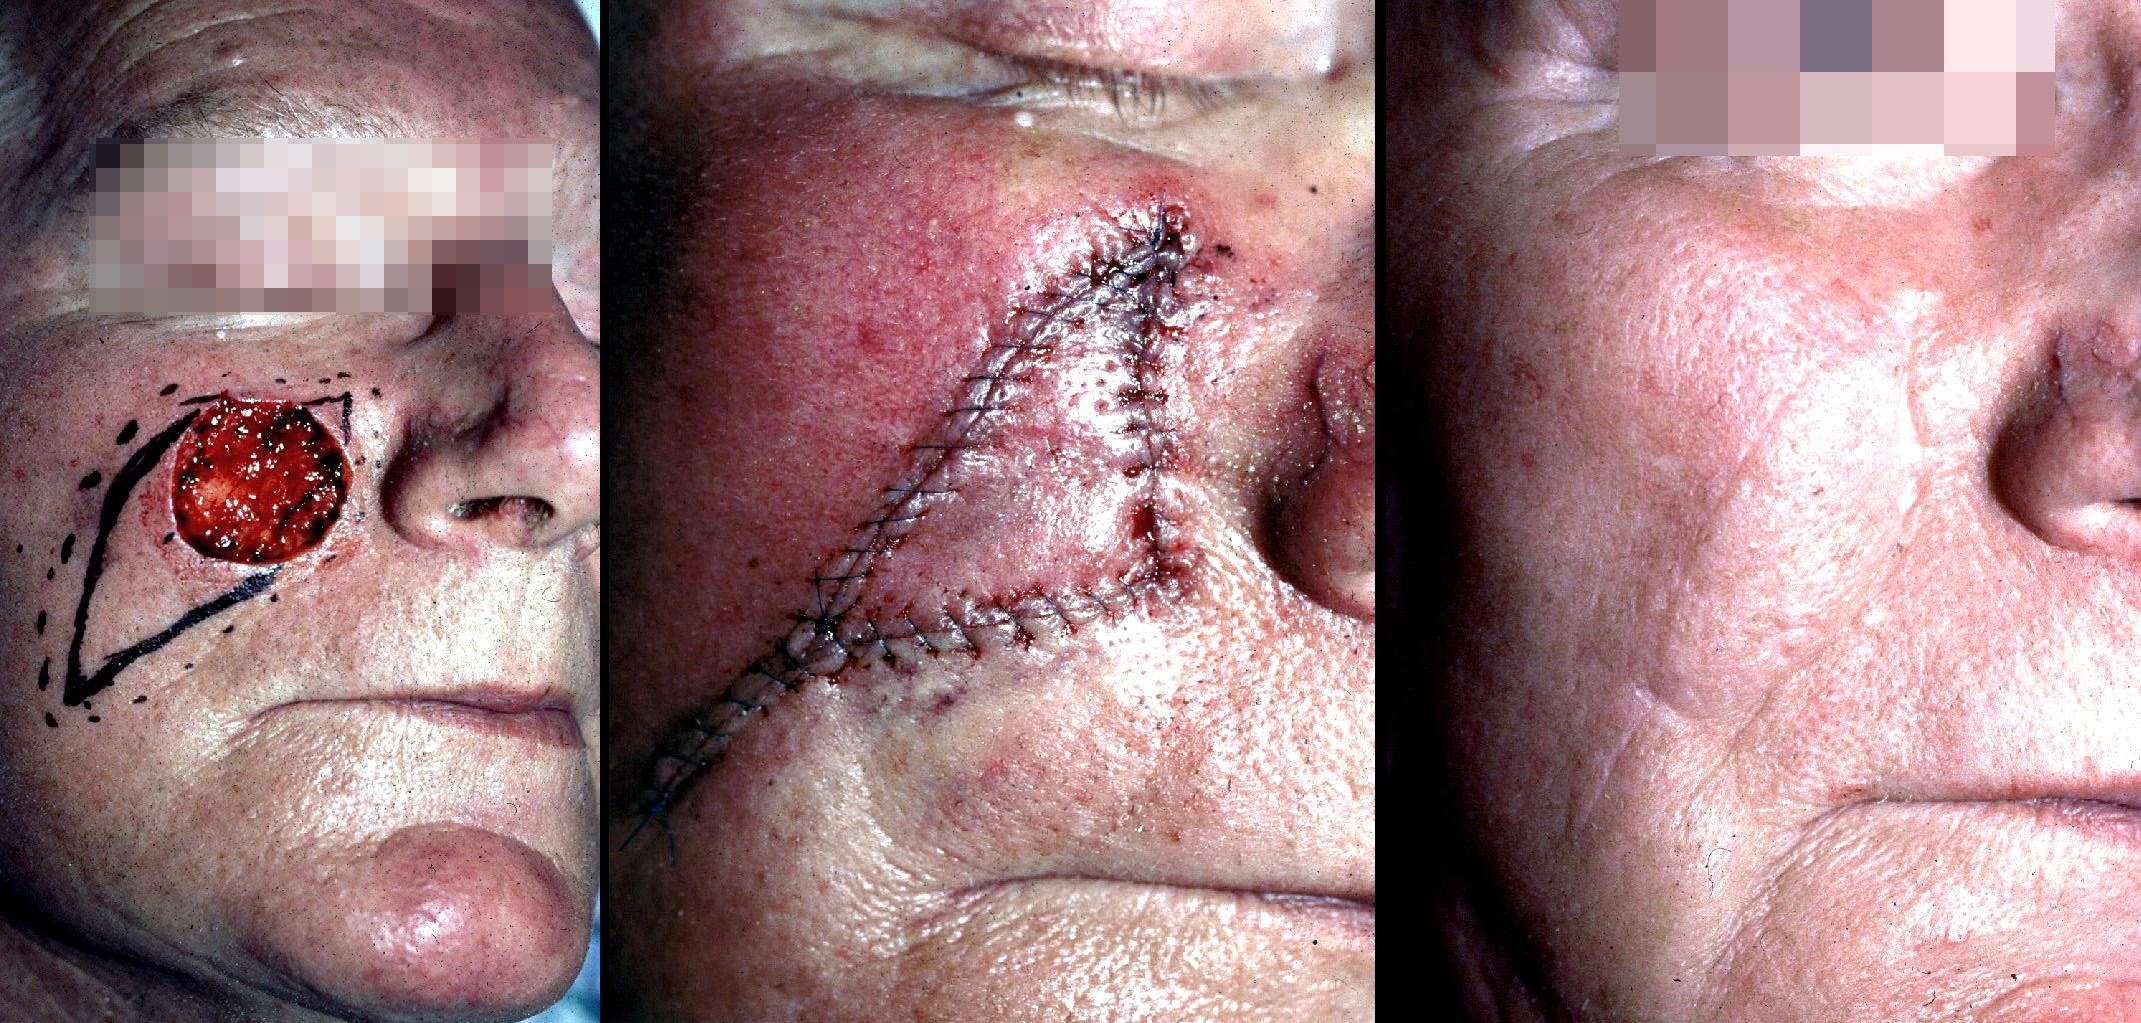
Medscape., 2014. Image of cheek reconstruction [digital image] [viewed 06/10/2015]. Available from: http://emedicine.medscape.com/article/1129354-overview http://img.medscapestatic.com/pi/meds/ckb/24/29424.jpg

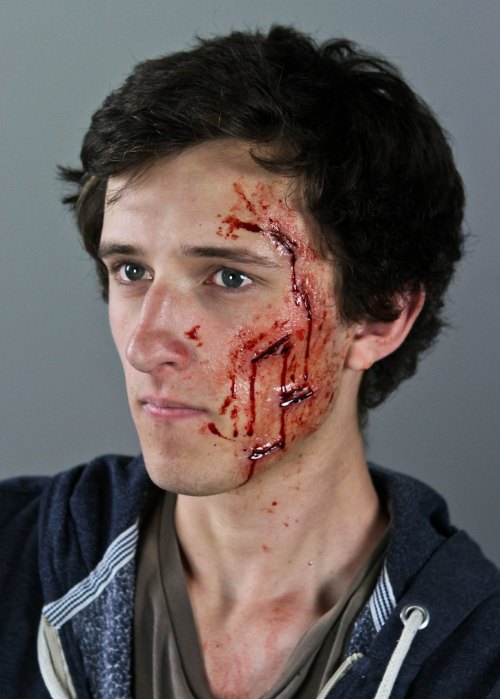
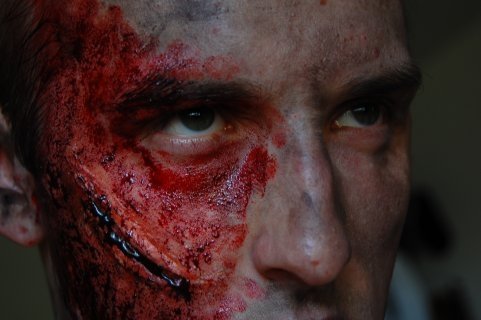
megrosetsfx., 2014. Artist's own creations uploaded to their tumblr account [digital image] [viewed 06/10/2015]. Available from: http://megrosetsfx.tumblr.com/post/96745748563/freakmosfx-cut-face-makeup-created-with-sculpt http://41.media.tumblr.com/a945434a33dcd29b688818a502750490/tumblr_mu56etYiYl1r26q8eo1_500.jpg

MOVIEWEB.COM., 2006. EXCLUSIVE: Stellan Skarsgard Puts On The Make-Up To Become Bootstrap Bill [viewed November 2015]. Available from: http://movieweb.com/exclusive-stellan-skarsgard-puts-on-the-make-up-to-become-bootstrap-bill/

Nastasi, A. 2011. Ranking Hollywood's Elderly Makovers from Best to Worst [viewed November 2015]. Available from: http://flavorwire.com/228835/ranking-hollywoods-elderl-makeovers-from-best-to-worst

Paint-sculpt.com., (Year of Publication Unknown). Sculpting Realistic Skin Texture [viewed 13/10/2015]. Available from: http://www.paint-sculpt.com/tutorials/sculpting-tutorial/sculpting-skin-texture.html

PETEDUCATION.COM., (Date unknown). Snake Shedding: Ecdysis and Dysecdysis [viewed November 2015]. Available from: http://www.peteducation.com/article.cfm?c=17+1831&aid=1648

Rickitt, R. and Harryhausen, R. (2006) Special effects: The history and technique. United Kingdom: Aurum Press.

SERAPHI, K., 2012. Making of Mr.Tumnus(from Japanese DVD) [viewed November 2015]. Available from: https://www.youtube.com/watch?v=ncKfRtxqzZ4

Smithsonian National Zoological Park., (Date Unknown). Snake Skin: Beauty...and Function [viewed November 2015].

Western green mamba (2012) Available at: http://en.citizendium.org/wiki/Western_green_mamba (Accessed: 15 November 2015).


zomgwaffles., 2009. Artist's own creation uploaded to Deviant Art [digital image] [viewed 06/10/2015]. Available from: http://zomgwaffles.deviantart.com/art/zombie-face-cut-2-124437535 http://orig05.deviantart.net/5193/f/2009/152/8/3/zombie_face_cut_2_by_zomgwaffles.jpg

The Final Look

When I began painting and creating the look, I became happier with the outcome, not because of how the prosthetic look but because of how I had the opportunity to redeem myself with the other elements that I wanted to create, such as the green skin and the peeling skin, although I am aware that the most important part is the prosthetic.


I did not encounter any problems while painting the skin, and I know that I would have had I not practiced it beforehand. I think that here I was successful in creating contour on the face with lighter and darker greens, and creating more depth on the chest; making the collarbones and shadows more visible.

It is also clear to me how much I learned from my mistakes in my practises. Firstly with the eyeliner and the eyelashes being too thick in the first practice; this time I was really satisfied with how the eyeliner looks as it is sleek and neat, and the eyelashes do not overpower her eyes like they did before as I cut them down. I decided to last minute disregard the necklace that I used in my practice as I felt that the colours were too contrasting with the red and yellow on the head; too many colours would have detracted from the green, black and gold. Moreover, I used supracolour for the lips this time instead of liquid liner, and placed the lines closer into the mouth and I feel like this gave a more realistic look and was closer to one of the images that I used for my inspiration. Lastly, buying gold string to wrap around the hair tied all the gold elements together I feel, and I only noticed that this would be effective from the photos from my practice.

Sue gave me different points of advice for my look. She suggested painting this black tongue onto the lips and mouth, and this gave an effective tribal edge to the look.

Overall, I am pleased with the whole look apart from the prosthetic area. This was the most important part that would have benefitted the most from practising, however I did not have enough time to do this, but it has taught me a strong lesson that it is important to be completely sure of the sizings of your pieces as this is definitely an element that let me down. I was pleased with the scales, but they were also too big for the face. I would also change the colouring as Sue commented on the colours saying they were too harsh and I agree, I think that a black and orange would have been more effective and matched the colour scheme better.

It is a shame that my prosthetics pieces turned out so disappointing as I was very excited to embark on this unit and now I feel as if I have not done myself justice and wasted my opportunities in a way. I would also liked to also done a look that is conventional of that of the TV and film genre, as my look is still fashion based, but in retrospect this must be the route I feel most comfortable in.

Application of the Prosthetic

When putting my prosthetic on Sylwia's face, I was not happy with it as soon as it went on. The baldiez layer was too far away from the edges of the silicone mould, and so when it went on, because the edge was too close to the hairline and the eyes, I had to cut around it and it turns out that the edges were made of silicone, not baldiez, meaning I would not be able to blend the edges. This was extremely disappointing; the point of creating a prosthetic is so that it realistically merges into the face and looks as if it is part of the person. This meant that my prosthetic didn't have realism and the edges were completely obvious. Because of this, I felt that I had to work really hard on the skin and the rest of the look to create obvious characterisation and detract from the terrible prosthetic application.


These are the photos from the first attempt at my application. At this point, this was where we discovered that I would not be able to blend the edges as they were silicone. If I knew that this had happened, I would have tried again, however I did not have enough time to try again, therefore had to make the best of the situation. After this, I took off the pieces and cut around them more so that it was not in the hair, and to reduce the impact of the appearance of the silicone. 

On the face, I found that the pieces I made were too big. While sculpting, I was continuously cutting them down so they weren't big in height, however it is clear that I didn't do this enough. Moreover, I feel as if the pieces should have extended all the way from the eyebrow part to the hairline. I am not happy with how the prosthetics look as I feel like they are too big for the forehead, and I wish I had been able to practice the moulds before I had done the actual thing as there are so many things about this that I would have changed in order for it to look more realistic and for it to look as if it really is part of the face, as I think that if this look had been done well, it could have looked really good. 


Here are the photos of my final application. The colour is not right as there was a setting on the camera that was on that none of us were aware of until Lottie was able to change this later on in the day, so this is why these photos have a blue tinge to them; the moulds were more green than this. Even in this photos I am not happy with the prosthetic or the application for the same reasons as in the explanations above. 


Monday 30 November 2015

Peeling Skin Practice


To create this look, I used liquid latex, a sponge and 1 ply of toilet paper. I dabbed the latex on my arm, then ripped sections of the tissue and stuck it on the latex. I repeated this process once more and then let it dry until it was clear. Next, I tried to colour match it with foundation, and then picked at one side so that I could create this peeling skin effect.

I was happy with how straight forward this method is and how the texture comes out when the latex is combined with toilet paper. I think that this will be easy to achieve while creating my look at university and is not time consuming but a fast method, so this is the most suitable way to create my peeling skin look.

If this method did not work then I could have tested out Snazaroo's Special FX Wax, or Ben Nye Nose and Scar Wax, however with these methods I would have had to sculpt the wax which I think would take too long combined with all of the other elements that I have to create.

Supracolour Practice


My practice with supracolour was much more successful than using aqua colour. Firstly, it does not dry and goes on with a dewy finish that can then be powdered if desired, so this gives me the option if I want to make the skin texture more like that of a snake (dry) or more that of a human (dewy). I was able to layer the paint without displacing much of what was underneath, and still felt as if I was able to work quickly and also able to blend into the hairline easily.

Another advantage with supracolour was my ability to contour with the green colour on its own, which I did not think about during the practice before. Here, I am able to mix colours to make the natural green that I want and also create more depth on the face and on the chest when I create my look.

Overall, this practice was incredibly helpful as if I had continued with the aqua colour I would not have been satisfied and the colour would not have been the one that I really wanted. Moreover, I am still able to highlight with supracolour and I feel like this is important to add to the texture and dimension of the face.

First Practice

I practiced my look in order to decipher what products I would use for the skin, and how to make the hair look how I want it to.

Firstly, I tested on my arm the difference between supracolour (on my hand) and aqua colour (on my arm). What I found with the supracolour was that it gave a natural green colour, however the skin underneath is still visible. This could be rectified with more layers, however I still felt as if this was too light to create a realistic effect that my character's skin is really green. In addition to this, I used a dark green eyeshadow on it to see what it would look like when I contoured, and this gave a strange dark colour that didn't look natural and didn't match the green I created with supracolour. 

Contrastingly I found that the aqua colour was not the right green colour, it is too much of a dark mint colour that i did not think was stereotypical of a green snake. However I thought that I might be able to rectify this by adding white and yellow to make it more natural. However what I liked about the aqua colour is that it is matte and fast drying so I don't have to worry about it sliding off while creating my look, it is also thick so there is no sign of the skin underneath. However I think that this thick, matte effect does not look natural. In addition to this, I used the dark green eyeshadow on this and it did not work either. Despite this, I decided to try the look with aqua colour. 


To create this hair, I used two different hair extensions wrapped around Sylwia's ponytail. Her hair is mid to long length naturally, so I had to find hair that would extend as long as I required when in a ponytail. I also think that these extensions are a perfect colour match on her hair.

I achieved this look by firstly putting Sylwia's natural hair into a ponytail. Next, I took one hair extension that had a slide in fastening, which made it not possible to wrap around, so I slid it in the underside of the ponytail at the top. After this, I wrapped the other hair extension around the ponytail many times. This gave an effective thick effect and also was not visible on the hair. These two extensions gave the perfect long, thick look for the ponytail. After this, I used small elastic hairbands to partition the hair and give the look that I created in my drawings.

The downside to this hairstyle is that Sylwia has bonds in the front of her hair, so my original idea to have the whole of the front of the hair pulled back would not work. Instead, I have decided to pull back as much of the hair as I can, and then use her fringe to cover the bonds but flatten the hair down as much as possible. However overall, the practice of the hair went very successfully.


Not having the prosthetic yet, I had to improvise where it would be with paint as this practice was mostly about getting the green colour right as it will cover quite a percentage of Sylwia's upper body. The aqua colour looks alright on my iPhone camera, however in real life it did not give the effect that I wanted. It was too thick and did not look realistic, and it was still also not the right colour. I also found that once it had dried, I couldn't go over with more without the product underneath displacing and revealing skin tone. I also found that the thickness and drying of it meant that it was not easy to blend into the hairline. Therefore after this practice, I decided that aqua colour would not be suitable and that I would need to practice with supracolour.

In addition to this, I felt as if I had made the eyeliner too thick, and the eyelashes were too long. Now after this practice I know that the eyeliner will look better with thinner lines, and that I will need to cut the eyelashes so as to not dwarf Sylwia's eyes.

Despite this, I was very pleased with how to ponytail went. I was apprehensive about using two different types of hair extensions, however both worked well together and the colour matching was perfect. The only thing that I will need to change is to take the fringe out and fasten it to the head, and to make sure that the bonds aren't visible.

My next step is to practice using supracolour for the green skin, and to practice the peeling skin effect.

Thursday 19 November 2015

Extra Products and Accessories

For my look I have needed to purchase some additional products and materials in order to add to the characterisation of my look.

Firstly, I purchased Liquid Latex that Kat suggested and a sponge that I will use to create the peeling skin effect.


This will give a more realistic effect of peeling skin than the Snazaroo Special FX Wax that I was going to use. I also found that when I've used this before it is difficult to colour as it is sticky. Now that I have this, I will be practicing how to use it to make sure that it gives the effect that I want. 


I bought fishnet tights that I can pin to the hair and paint over to create a scale look on the hair which creates a transition from the prosthetic to the hair. I have also used these before to create mermaid scales.


I found these tattoos, and think that some of these would be perfect for the arms to present regality and a tribal look. I need to test them to see whether they look believable. 


I bought some earrings and 'hair bando', which I will be using as a neck choker. I thought that these items looked mayan and tribal as the earrings are a triangle shape which the mayans used a lot. The choker is beaded which is tribal in that it looks hand made. They both have gold in them, and I think that they will add to the tribalism and regality. 

The eyelashes I got are separated like I envisaged, however they look as if they will be too long for my model's eyes, and so I think I will cut them. I will test them on her eyes before I do my shoot as I don't want to get there and realise that they do not fit or are too large.